{ STEM 2.0 }

This class is a continuation of our STEM I class. We work in teams based on a business model. The CEO (I was one of the students chosen to be a CEO), choses 3 other people to be their CIO, CTO, and CMO, and together, we come up with an idea for an assistive technology device that will help address a need in our community. We work hand-in-hand with our client to tailor the device specifically for their needs, and at the end of 4 months, we have a cool prototype to present at the Assistive Technology Fair.

Groovy Self-Cleaning Glasses

I worked with Lindsey Paradise, Heidy Rodriguez, and Timothy Schowalter. We formed an epic team called the Groovy Girls, and our project was the Groovy Self-Cleaning Glasses.

Logo

Groovy Girls Logo

Problem Statement

All glasses wearers are familiar with the issue of dirty glasses, which not only makes it more difficult to navigate everyday life due to smudges and debris buildup on the lenses, but can also pose risks to autonomy and health. Over 4 billion people around the world wear glasses, making smudges and debris a widespread problem among all populations, but especially the autistic community. 13.5% of children with autism have a vision disorder, compared to only 3.5% of neurotypical children. Furthermore, individuals with ASD may touch their lenses more frequently, compounding the issue of dirty lenses — one 17-year-old with autism was reported to have touched his lenses around 60 times a day (S. Machado, personal communication March 24, 2024). It is recommended that glasses be cleaned at least once a day to prevent build-up of debris and oils on the lenses. This task is not always easy though, as both children and adults with autism spectrum disorder (ASD), including the client of this project, may struggle to clean their glasses for a variety of reasons.
Preliminary Designs

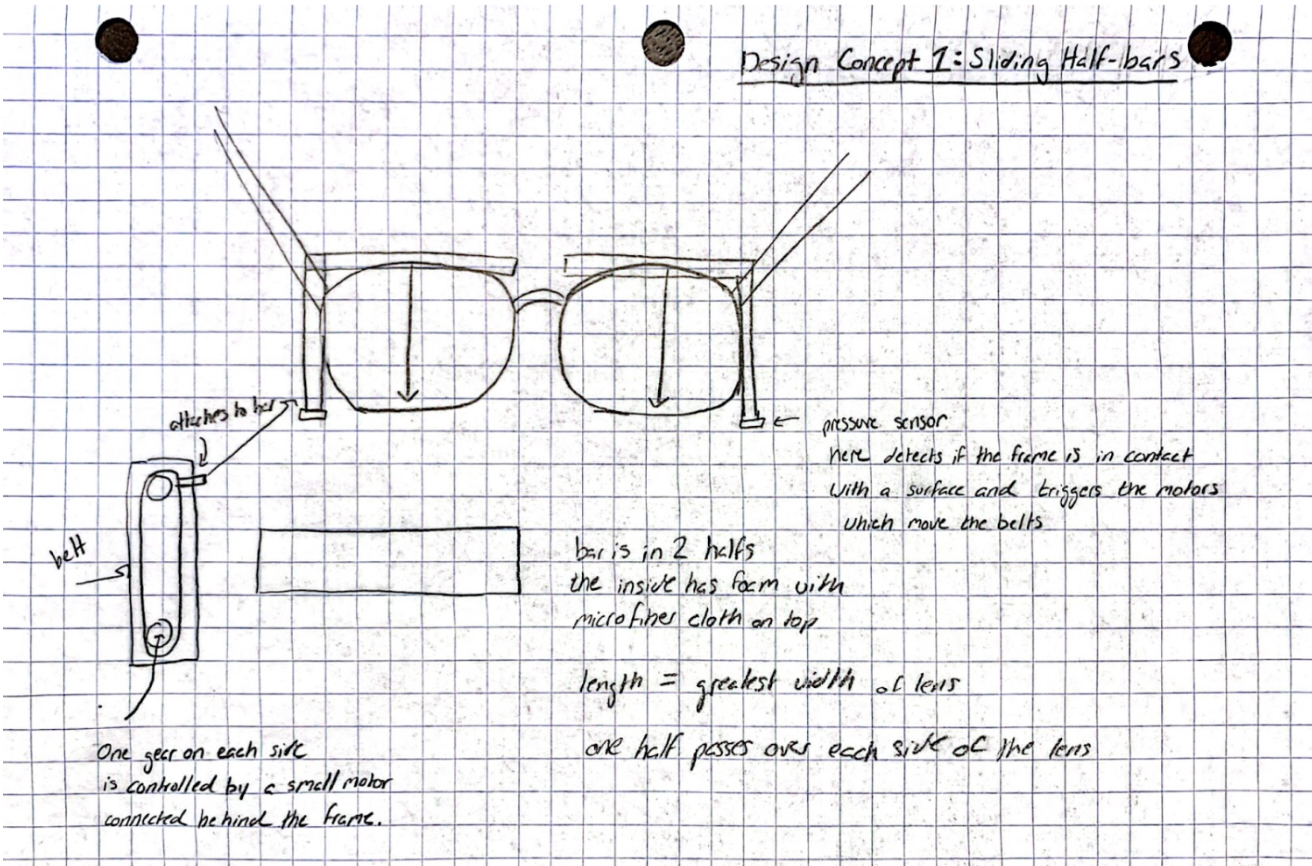
We initially proposed three preliminary design concepts. Our first preliminary design concept consisted of the Sliding Half-Bars (Figure 1). This design included an adapted glasses frame with vertical blocks on the sides. Each vertical box contained the mechanisms to control one half bar, which cleaned one lens. The design also included a motor-driven pulley. Whenever the user put their glasses down on a hard surface, the buttons on the bottom of the frame were depressed, activating the motor-driven pulley. When activated, the pulley would move a belt with a rod that controlled the sliding half-bar. This device would be lightweight, and would not require the user to initiate cleaning. However, this design might have been more bulky and larger than regular glass frames.

Preliminary Design pictures

Picture of preliminary sketch #1

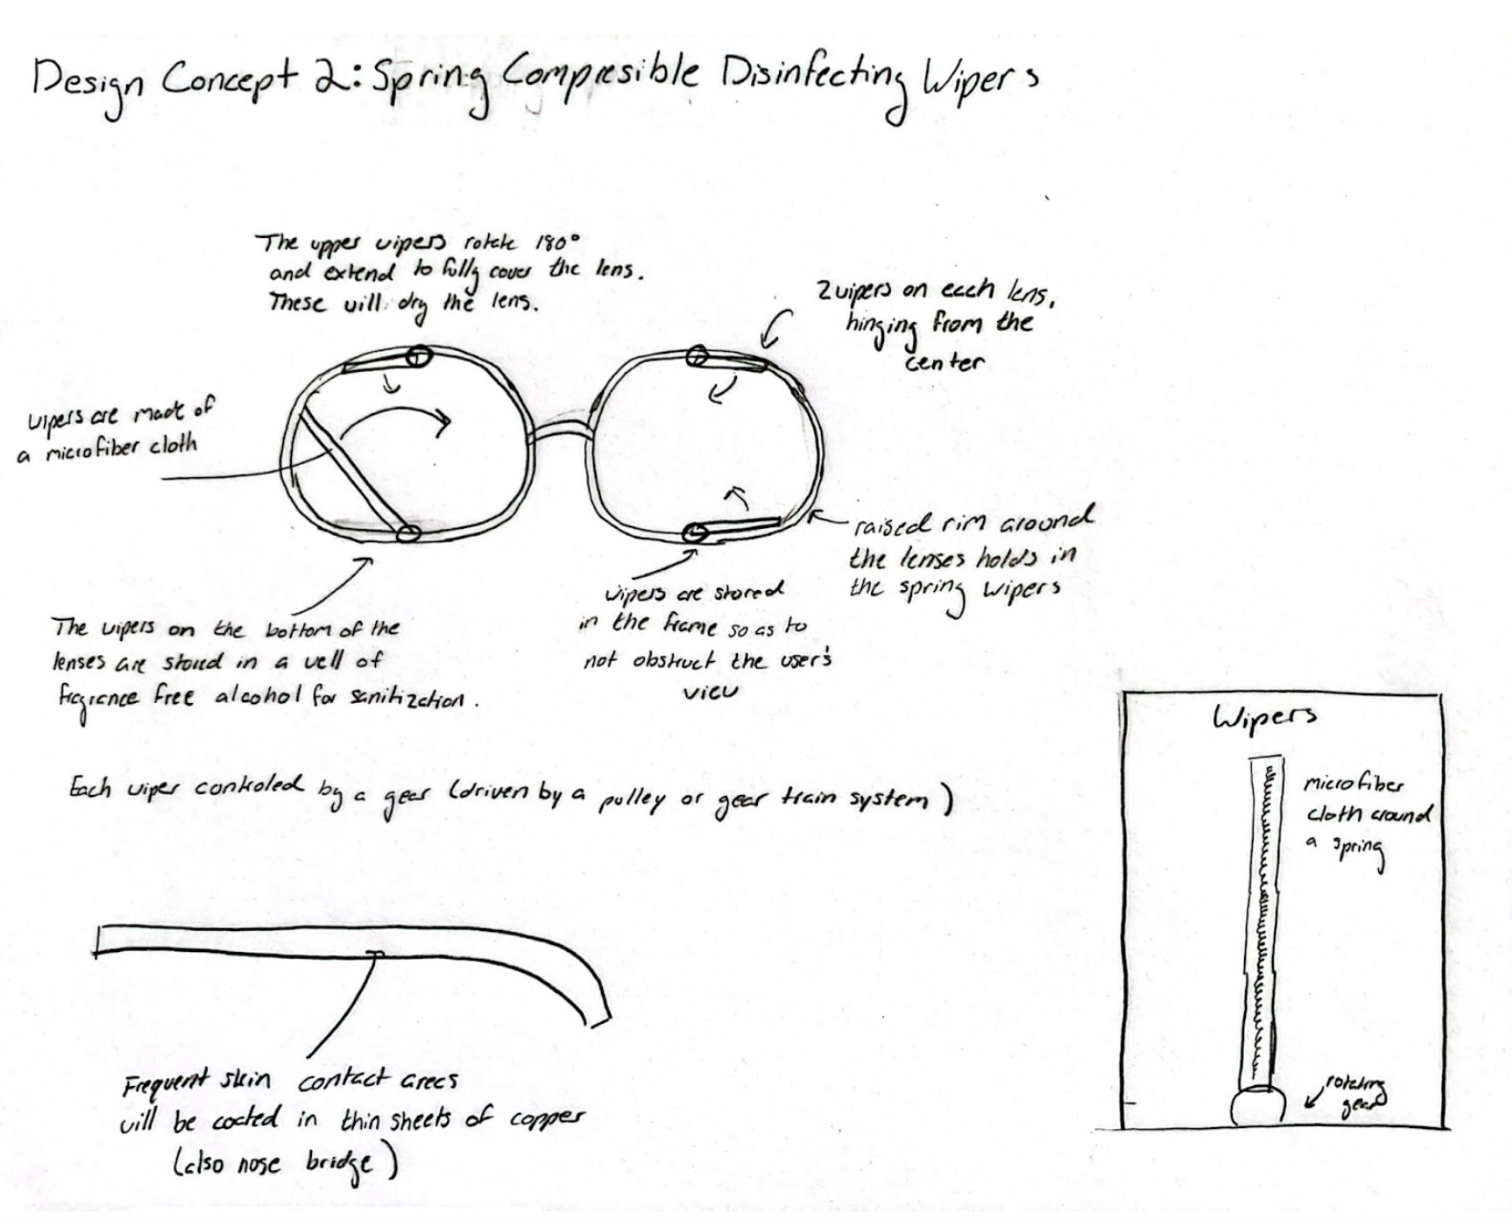
Another proposed design was the Spring-Compressible Disinfecting Wipers. This design consisted of four compressible microfiber-cloth-covered wipers to remove smudges. Each wiper hinged from the center of the frame and rotated 180 degrees. On the back side of the frame, there was a compartment that stored two motors. Each motor powered a pulley system that controlled the wipers on the top and bottom of one lens. When pressure plates located on a contact area were not under pressure, these motors would activate and move the wipers around the surface of the lenses. Each wiper had a spring inside of it so that it would be able to reach the entire surface of the glasses, extend, and stretch to fit the area of the lenses.

Picture of preliminary sketch #2

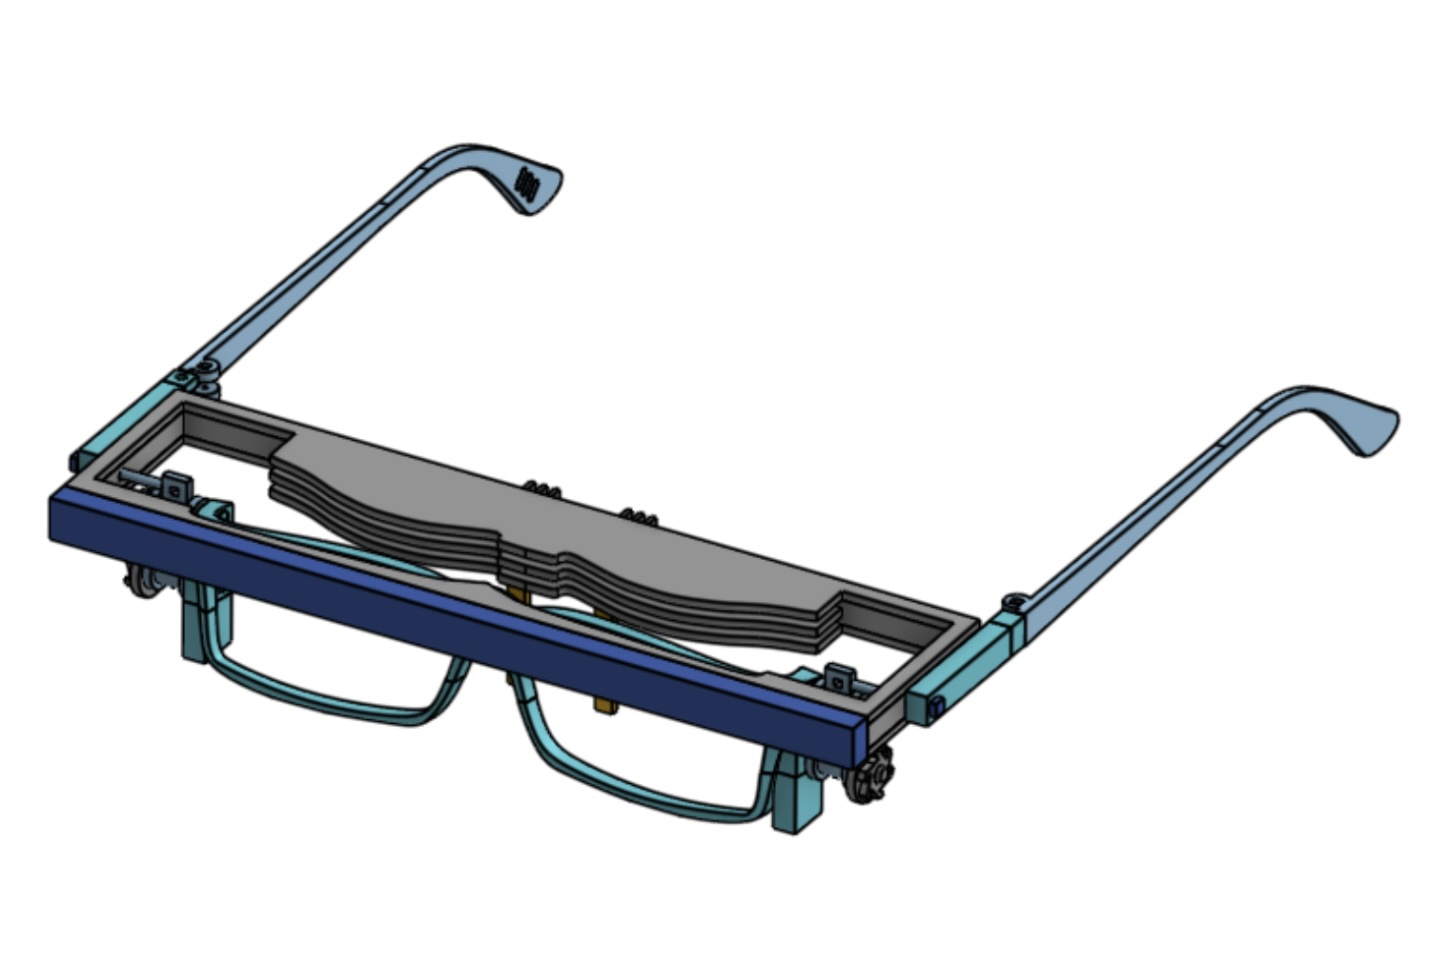
Our final design concept was the Groovy Gravity Glasses, which utilized gravity to drive a wiping component. It attaches a bar containing the sanitizing and wiping to a vertical belt on the side of the glasses frames. When the glasses are in use, the lenses will be suspended below the frame, and once the glasses are placed on a hard surface, the frame will slide down over the lenses resting on the table, cleaning the lens. The nose bridge of the glasses will consist of two pins attached to the back of the sliding bar. When the glasses are in use, the nose pins will rest on a person’s nose to keep the frames on the user's face. Once the glasses are set down, the pins will fold down to enable the bar to slide down over the lenses. The contact areas of the frames will also be masked in copper tape to initialize the disinfecting process and ensure that our client doesn't face sensory sensitivities while wearing it.

Picture of preliminary sketch #3

Building

When putting our prototypes together, we followed a 4 step process:

Step 1: Print the CAD files. Speaking of which, I have learned that I am NOT a CAD person. For those of you who enjoy 3D modeling, I'm happy for you, just please don't make me do it ever again. I'm pretty sure we spent upwards of 60 hours collectively CADing. The amount of sleep I lost was insane.

Step 2: Assemble the Model. This is the part I enjoyed more, although I will say that putting together a prototype is a big difficult when your measurements are constantly off. At one point, Lindsey had to saw the bar on the glasses in half and Frankenstein it with pieces from an old print to make the bar long enough to fit around the lenses and glasses.

Step 3: Add Copper Tape to the Legs. Did you know that copper has natural anti-bacterial properties? I didn't until this project. We were looking for a way to disinfect the parts of the glasses that people tend to touch the most (specifically the lenses and the legs that rest on the ears), hence the naturally self-sanitizing copper tape!

Step 4: Saturate With Sanitization Fluid. We pipetted a lens cleaner fluid onto sponges in the bar of the prototype. These sponges touch the frame of the glass and so when the bar slides over the lenses, the fluid will disinfect them.

Testing

We performed three design studies:

Design Study 1: Absorbance. This design study aimed to determine which of the two candidates for fluid-containing material would be able to retain more lens fluid at once. The device is intended to minimize the amount of maintenance required from the client in order to keep the lenses sanitized and clear. Thus, a material that can hold more cleaning fluid will be more likely to hold fluid for longer. The material with the greater fluid capacity will require less frequent replacement of cleaning fluid and be better suited to the device. Ergo, the amount of fluid absorbed by the more effective material is indicative of the effectiveness of the prototype at absorbing large quantities of fluid.

Picture of data from design study 1
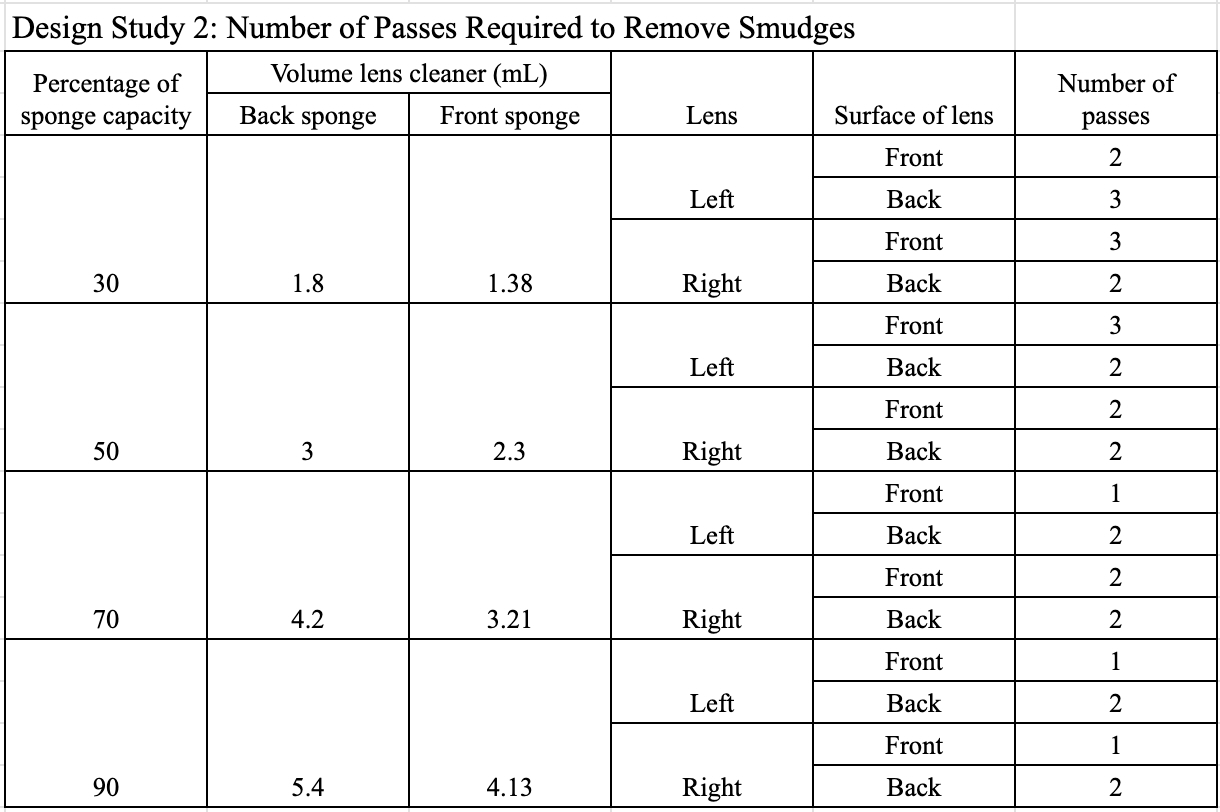
Picture of data from design study 2
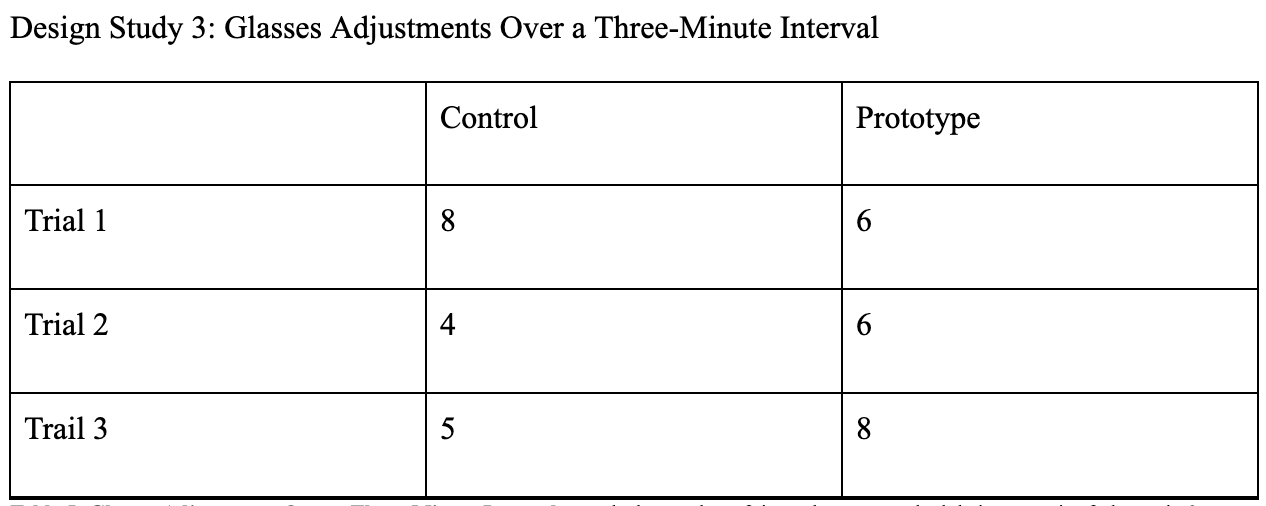
Picture of data from design study 3

Design Study 2: Smudge Removal. The device aims to provide clear vision for the user by clearing off smudges effectively, so design study 2 was performed with the objective of indicating the effectiveness of the prototype at cleaning smudges efficiently. Furthermore, while the maximum capacity of the sponges was determined in design study 1, reducing the saturation of the sponges would reduce the risk of fluid dripping onto the user’s skin or eyes. To that end, the level of saturation of the sponges was varied to determine the minimum level of saturation required to effectively clean smudges.

Design Study 3: Do Glasses Sit Securely on User’s Face? The device should assist the user in their daily life rather than causing annoyance. To this end, design study 3 was performed to determine whether the device could be used like a normal pair of glasses, and whether the design was comfortable for the user.

Prototype Versions

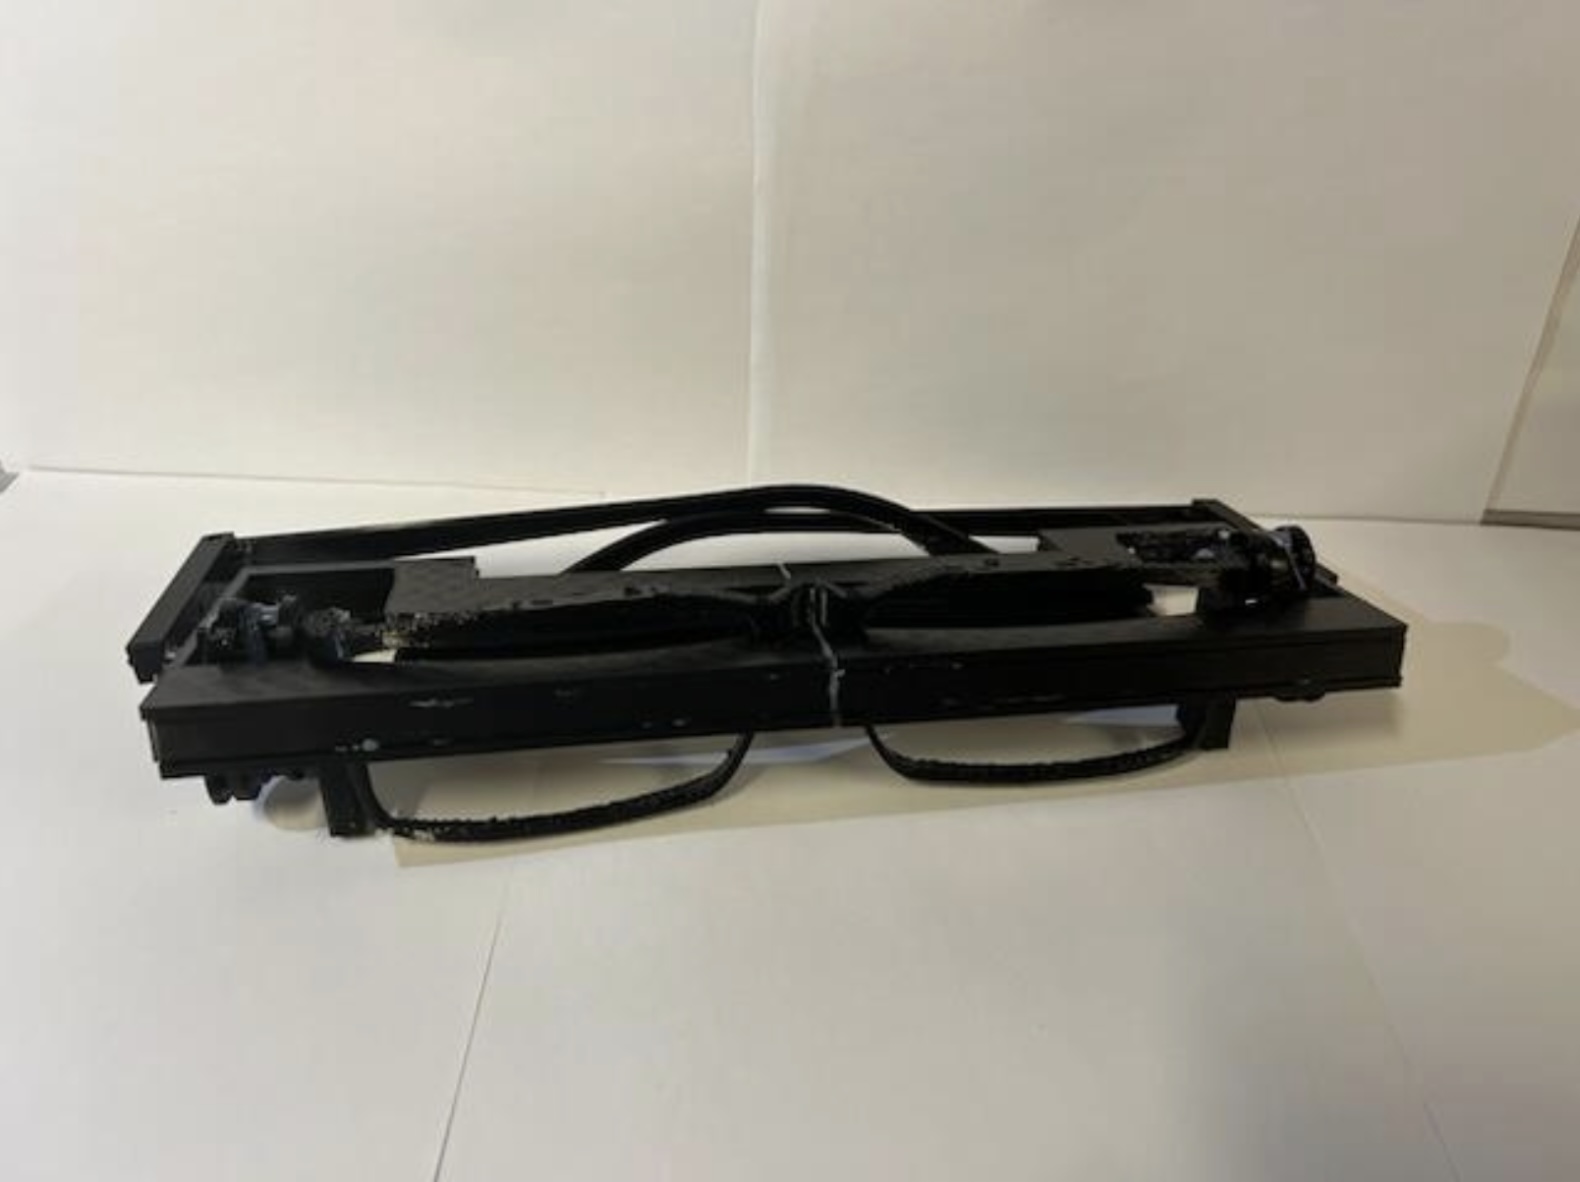
We went through 4 different versions of our prototype. The initial prototype was we’s first time 3D printing the parts from the CAD files. The parts had been designed with fine details and were modeled so that they would fit together precisely. This resulted in pins not fitting into holes and the lower holes on the glasses frames not fully printing, so many parts that had been intended to move simply had to be glued in place. Furthermore, the 3D models had been sent to be 3D printed in their complete, finished forms without having given consideration to how support structures would impact the functionality of these parts. Due to the placement of support structures, the sponge and cloth could not fit in the bar and the pawl could not fit into the ratchet.

Prototype pictures

Picture of prototype version 1

After the initial prototype did not provide evidence that the design concept would be able to produce a working product, we created a second prototype with all parts scaled up 2x so that the design itself could be tested without the challenges associated with the small size of the parts getting in the way. In addition to the scale being changed for this design, the bar and ratchet were split and printed as multiple parts that could be glued together after printing. These changes successfully prevented the issues with support structures that had been encountered in the initial prototype. To prevent the issue in the initial prototype with the lower holes of the frame not printing, thicker rectangles were added to the sides of the frames to ensure that there would be enough material around the holes for them to print properly. The final change was to print the pins connecting the wheels to the frames at 1.8, 1.9, and 2.0 scale to test which of these scales would work the best and gain a better idea of how to size these parts in future iterations. Although the sponges, cloth, copper tape, and lens cleaner were not utilized in this version, the 2x scaled prototype provided evidence that the belt system could work, especially the ratchet and pawl. The prototype also demonstrated that the bar rubbed against the back of the frames on the way down and the front of the frames on the way up as it had been designed to do. The only issue noted with the 2x scaled prototype, aside from the vastly unrealistic scale, was the fact that the elasticity of the rubber band allowed the bar to hit the table without forcing the junction to the bottom of the wheel.

Picture of prototype version 2

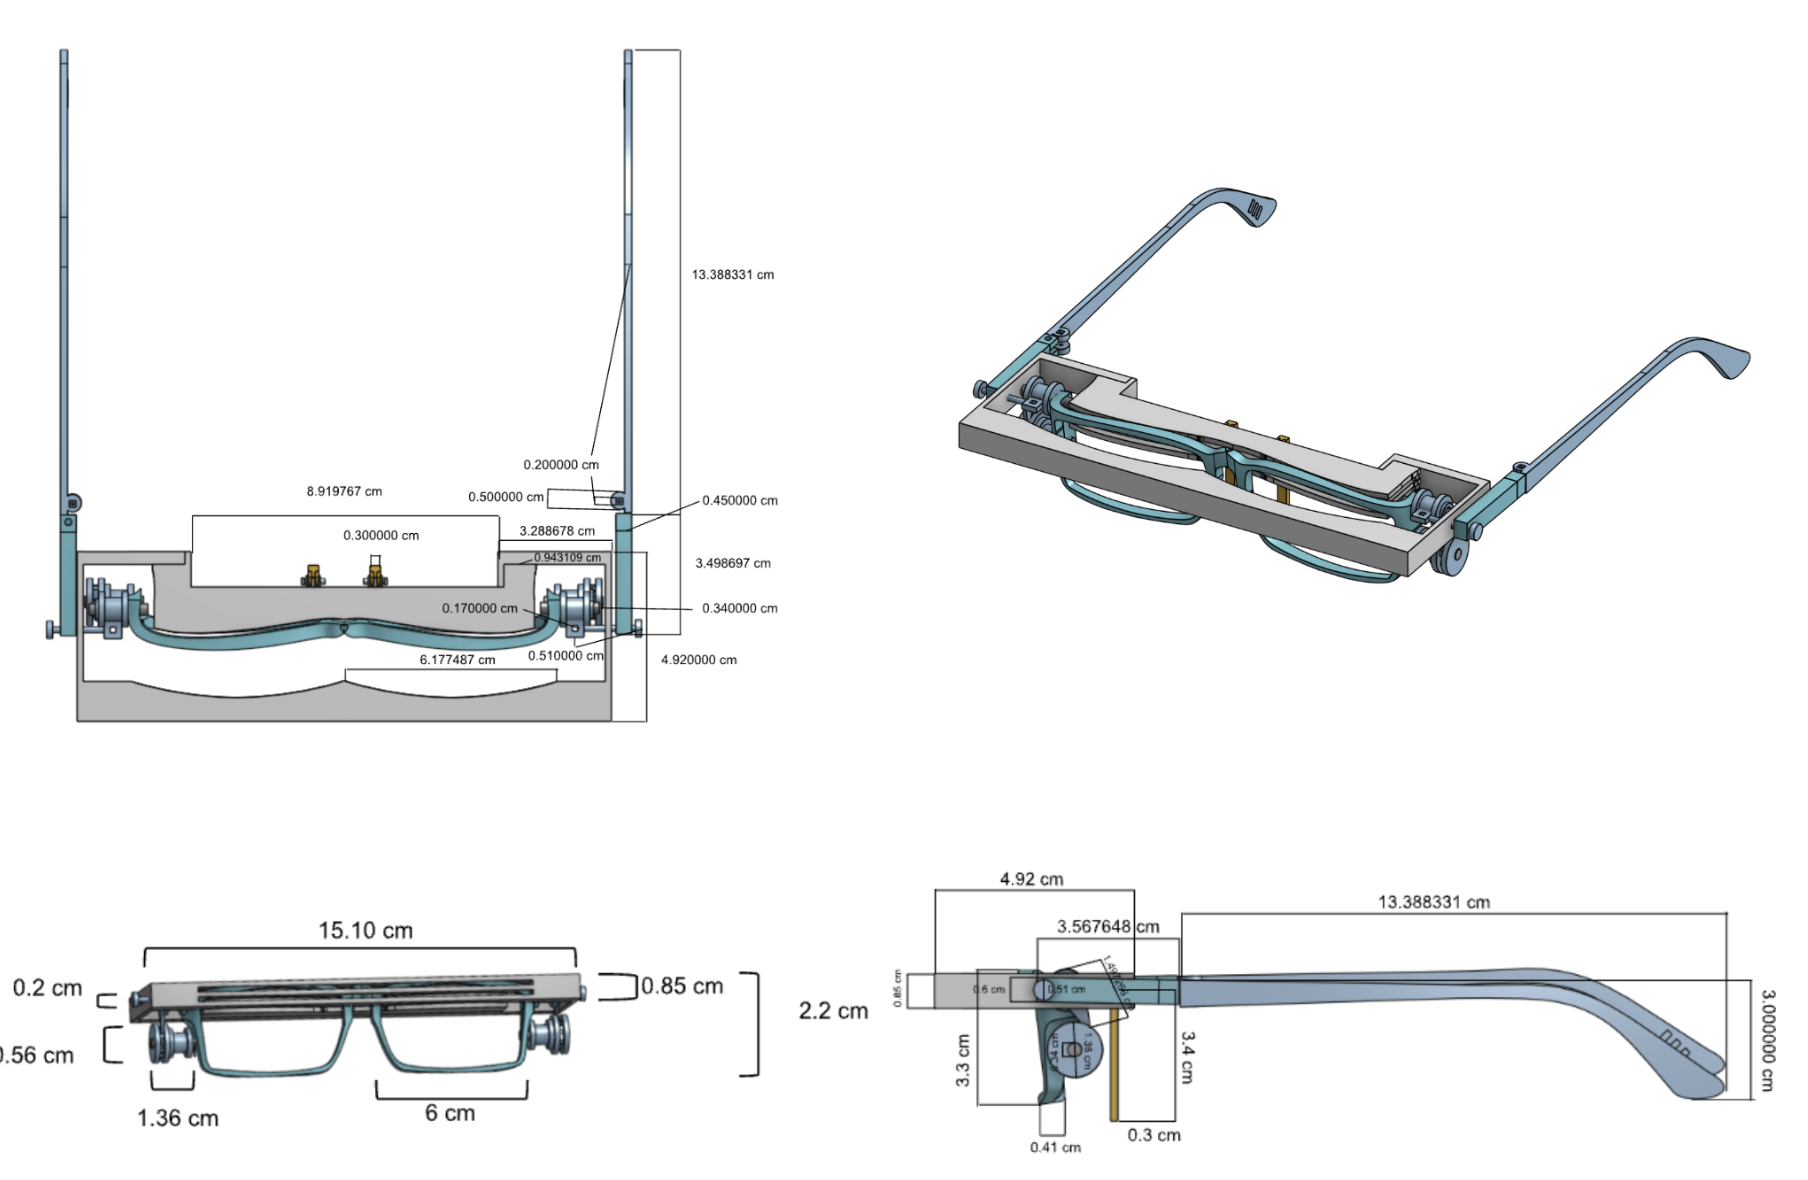
The Fine-Tuned Adjustments prototype scaled down the design and made several changes to ensure that the parts would fit together correctly once the lenses were added. The beneficial changes from the 2x Scaled Prototype were retained in this prototype — the rectangles on the sides of the frames remained and the pins were scaled 0.8x in light of the smallest pin size (1.8x) working the best while constructing the 2x Scaled Prototype. Additionally, the lower wheel was moved upwards in hopes that the junction would be forced to go all the way around the wheel on its own just from setting the bar down on the table. During the planning of this prototype, it came to light that the contour of the bar had been designed according to the contour of the client’s glasses frames, which did not match the contour of the lenses themselves. The frames also had to be redone to better match the shape of the client’s lenses. For these reasons, the bar contour was modified to fit the lenses rather than the frames, and the legs were thickened. The Fine-Tuned Adjustments prototype was never constructed, as we realized immediately after printing that the holes of the nose pins did not line up properly with the holes in the hinge on the bar. Additionally, the legs were flimsy and had to be thickened.

Picture of prototype version 3

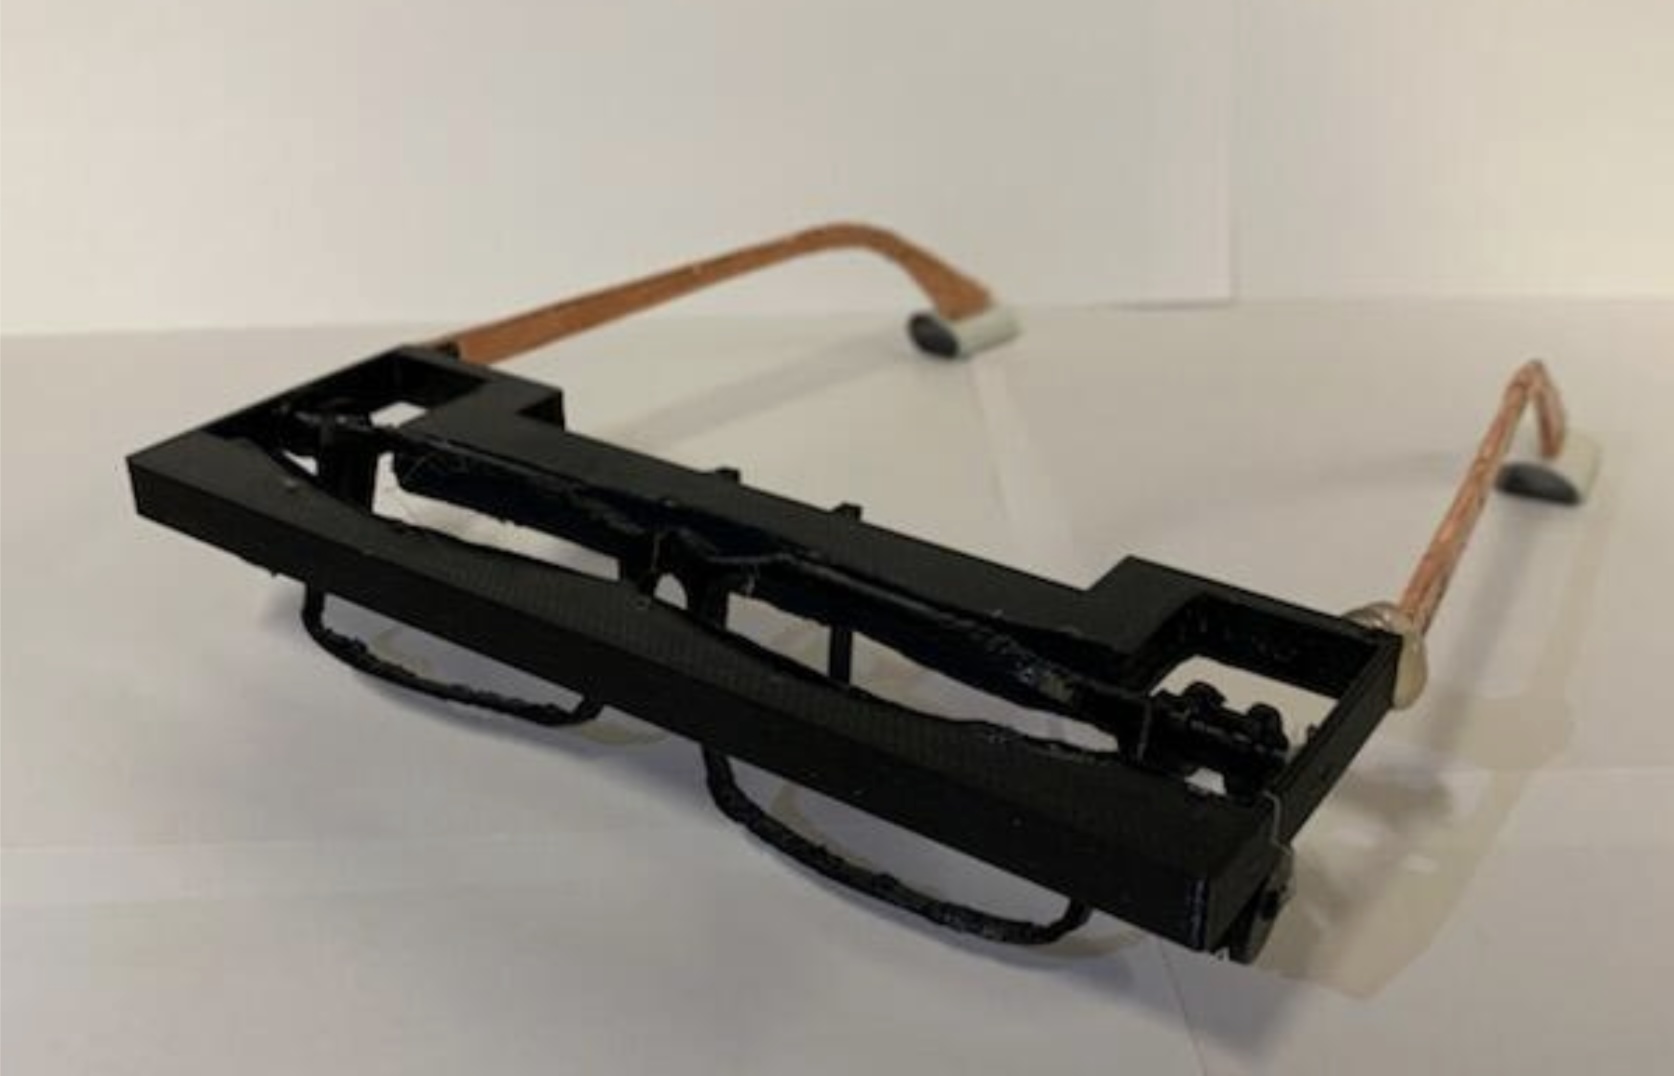
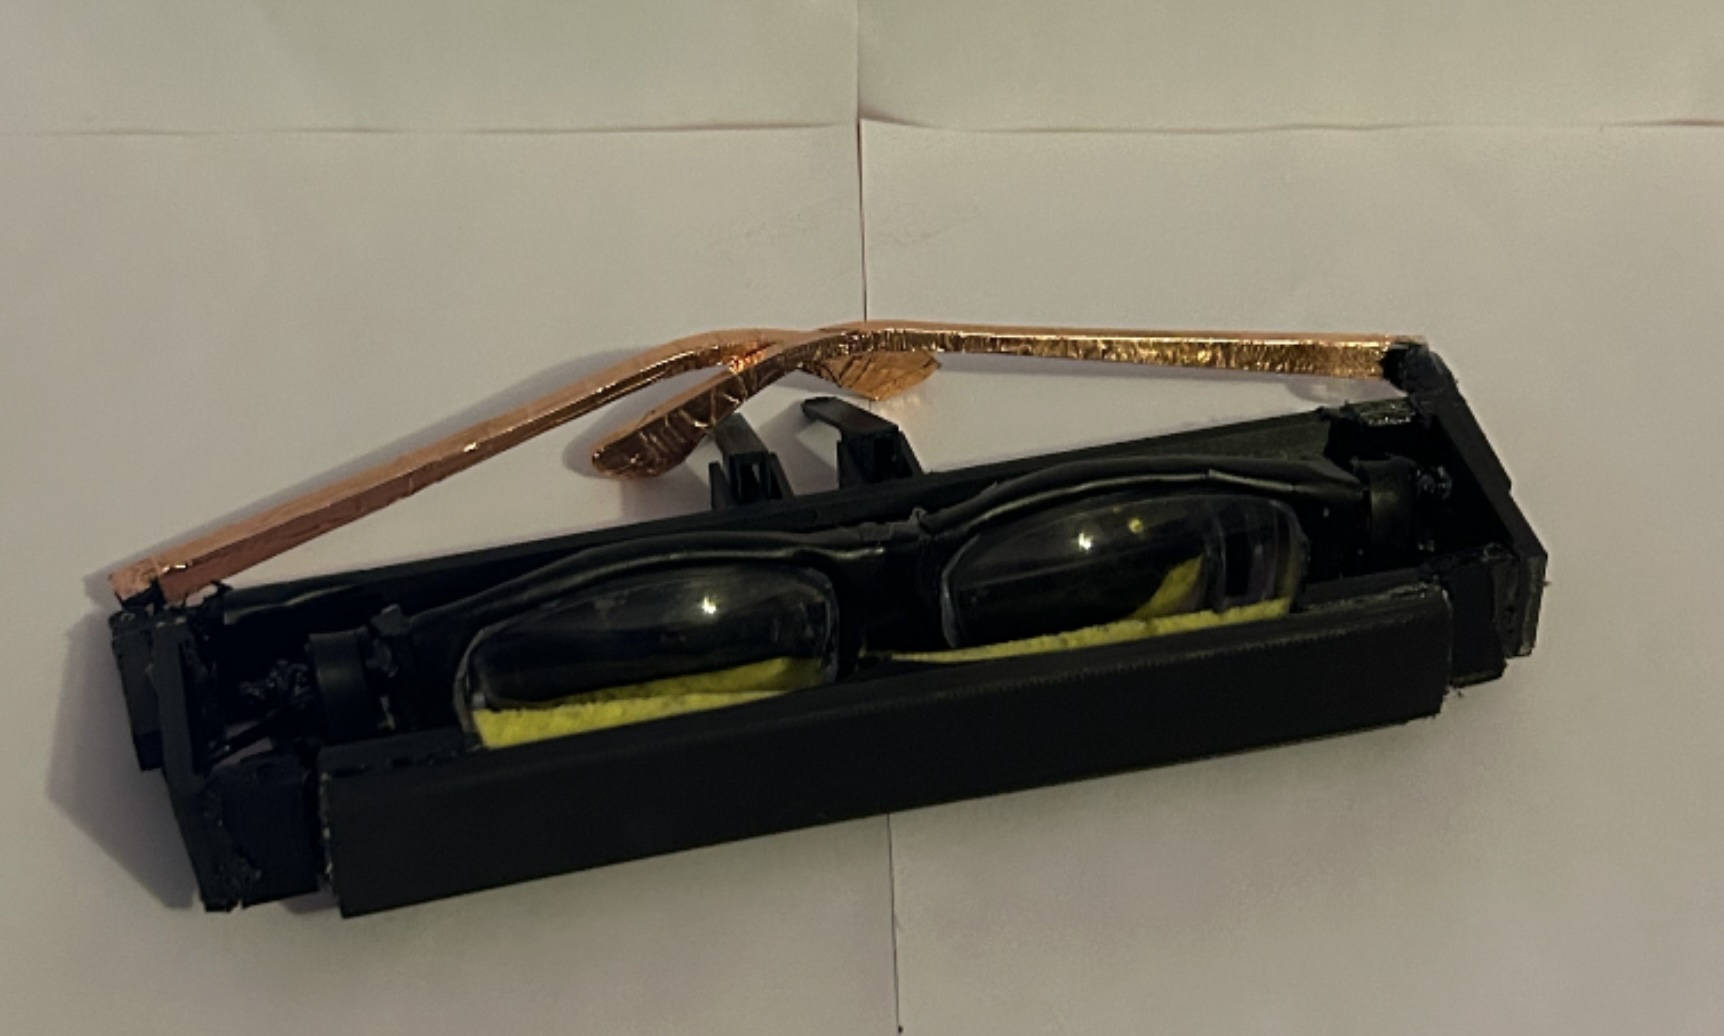
Our team presents the Groovy Self-Cleaning Glasses, an innovative piece of eyewear that assists the user in the cleaning process. This design not only eliminates the need for the client to remember the variable task of cleaning their glasses but also sanitizes all of the major contact areas to help mitigate health risks. Our CAD labor of love can be found here if you want to take a look at our 3D model

Picture of final prototype built and assembled

Groovy Girls Poster

Shout out to Lindsey, Heidy, and Tim! This project was insanely hard, but we managed to get it done and functional. We were an amazing and fun team (by far the grooviest). I'm glad I got to work with you guys. Thank you for making STEM fun.

It was so nice we did it twice!