ME 3901 Engineering Experimentation
Mechanical Engineering Department
Worcester Polytechnic Institute
Stress and Strain:
Measurement and Analysis
· 1D Stress Analysis
· 2D Stress Analysis
· How to Measure Strain
· Strain Gage Resistance Differentiation
· Commercial Strain Gage
· Whetstone Bridge Analysis
· Voltage Divider
· Whetstone Bridge-Continued
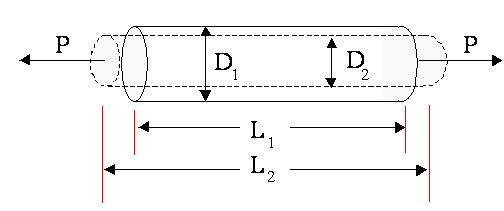
All machines or structural members deform, to some extent, when subjected to external loads or forces.
For Axial loading:
 where
where 
![]() = Axial Strain (Len/Len)
= Axial Strain (Len/Len)
L1 = Initial (Linear Dimension)
L2 = Final (Strained) Linear
Dimension

Frequently, one uses the term
micro-strain or m-strain since the
actual ![]() L is very small
L is very small

A Stress – Strain relationship for a simple uniaxial load or outer fiber in a beam in bending can be expressed as:
 or
or ![]()
where
E
= Young’s
Modulus ![]() = Uniaxial Stress
= Uniaxial Stress
![]() = Strain in direction of Stress
= Strain in direction of Stress
and Poisson’s Ratio is defined as:
 =
Poisson’s Ratio
![]() =
Lateral Strain
=
Lateral Strain
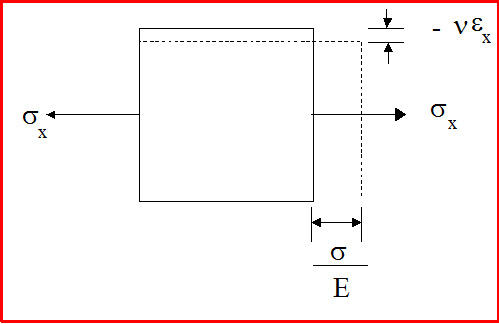
Consider a small differential element (x1 = y1 = z1 = dx and dv = dx3) subject to
Orthogonal Stresses sx and sy
Initially, only sx is applied


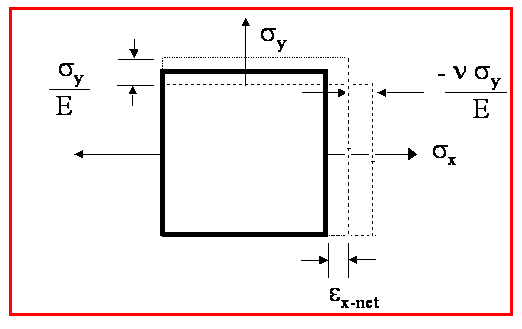
Now apply a stress in the Y direction:

The net strains are:
 and
and 
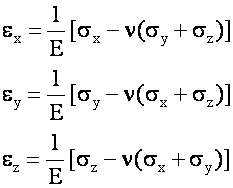
which can be rearranged to:


If one applied a stress in the Z direction using the same sequential application:

Photoelastic Coatings Great for concentration
Brittle Coatings points
Grid Methods Requires appreciable
 deformation under loads
Extensometer (mechanical and optical)
Moire’ (“More Ray”) technique (wavy fringe patterns)
Used for whole-field displacements
Electric – Resistance Strain Gages
- Most widely used method
- Electrical resistance changes with mechanical deformation
A strain measurement must be made over a finite length. (base length).
Deformation Sensitivity – minimum deformation detectable with a gage.
Strain Sensitivity – deformation sensitivity / base length
 where r = resistivity of
material
Differentiating 
(Simple Product
Rule)


If sample is cylindrical and axial strain only is applied:


Recall:

(Poisson’s Ratio  )
)


Define:  in Local Vicinity
Then

If the quantity  then
F = 1 + 2n
= 1 + 2(0.3)
= 1.6
BUT  However,
it IS constant over the range of interest.
Therefore, manufacturers specify the value of F (They experimentally measure F)
Frequently, F ~ 2 (for metal strain gages)
For some silicon based materials F ~ 100
The Manufacturers also specify the strain gage resistance, R
Then, the local strain can be determined via:

Since F and R are given,
Measure ![]() and then calculate e
and then calculate e
Consider:
F = 2 and R = 120 W
Most commercial strain units can detect a strain
of 1 m-strain
What ![]() causes
this level of strain?
causes
this level of strain?


An ohm meter will have trouble detecting this change!
R = 120.00024
National Instruments has additional material for strain gage configurations
Signal Conditioning is Required.
|
most commonly used. It is a purely resistive bridge. It provides a
means for accurately measuring resistance and for detecting small changes in
resistance.
where the meter is a voltmeter – negligible current flow
The bridge is really a pair of voltage divider circuits
D – A – B and D – C – B
Voltage read across A and C midpoints
Consider the situation where the Bridge is balanced
(and Ig = 0)
V = I R
I1 = I2 since Ig = 0
I4 = I3
Also with Vg = 0
I1 R1 = I4 R4 and
I3 R3 = I2 R2
But with I1 = I2 Then I2 R1 = I4 R4
and I4 = I3 I2 R2 = I4 R3
or 
Therefore, Resistance Ratio of any 2 adjacent arms must equal the Resistance ratio of the other 2 arms when taken in the same sense (i.e. L/R or T/B)
|
Know Vi = I (R1+R2)
Voltmeter (Vo) draws no current
Then Vo = I R1
But I = Vi /(R1+R2)
And Vo = Vi R1/(R1+R2) Voltage Divider
Now
return to the
Vo = Vmeter = Vc – Va


let R4 change by a small amount, say (![]() 4)
4)

Vo is Zero initially.
Reduce ( assuming R4 = R3) then R1 = R2

if ![]() <<
1 then 2(
<<
1 then 2(![]() ) << 4
) << 4
and


